skip to main |
skip to sidebar
 Step 1. Cut out a piece of felt that is shaped like a slice of pie, NOT a triangle. The bottom part must be rounded, as if you had drawn it with a protractor.
Step 2. While it is still a nice flat little thing, run it through the machine with any fancy stitches you like.
Step 3. French knots for the 'ornaments'. I wound the thread around the needle TWICE to make them slightly bigger. It's all just what you like. Here is a tutorial on how to do french knots if you have never done them before.
Step 4. Turn right side in and sew along the side.
Step 5. Stuff with stuffing!
Step 6. Lay your cone on another piece of brown felt (or whatever color you like) and trace around it with chalk. This will be your bottom.
Step 7. Sew bottom on to the cone. Any stitch will do! It doesn't matter if the stitches are visible...I think it looks cute.
Step 8. Before sewing the bottom completely on, find something to shove into the bottom to keep it 'bottom heavy'. Otherwise this wee thing will want to just blow away. I simply wrapped about 2 tablespoons of rice in a paper towel and crammed it in there. You could use dry beans too.
Step 9. Sew up the opening and you are done!
Step 10. Give to loved one :o)
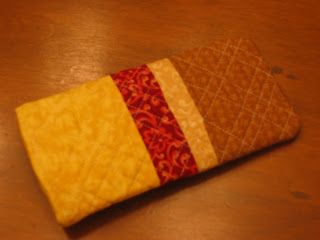 I made this eyeglass case for John's birthday using the pattern from Denyse Schmidt's Quilt-It Kit. The pattern is also in the Quilts book, but i liked having the little card from the kit to take back and forth with me from cutting table to sewing machine to ironing board. It was a lot of fun because it wasn't a rigid pattern and it was easy to machine quilt in a not-so-parallel fashion. The only hard part was hemming the opening with all those layers!! I think I achieved as manly a quilted eyeglass case as possible. I used fabric from those little quilting bundles sold at Joann Fabrics.
 The interior is freakin' sweet too! Too bad I couldn't get a good shot!
I had an idea for this last weekend, and it came out exactly how I pictured. Simple.
Finally I can post pictures of the doll! It was Mateo's birthday last weekend, and this is what I made him. The pattern is from Wee Wonderfuls, for the little boy named Archie. It took about 2 weeks or so, and doing the bottom and the legs lent to hours of cursing. Well, maybe minutes. Here he is making friends with Phoebe: Here is the back where you can see the acorn backpack, also from Wee Wonderfuls. I used kona cotton for the face and hands, wool for the body and arms, poly blend for the legs, and regular craft felt for the hair, eyes, and shoes. With this project I learned how to do stitches in the middle of the face without leaving a visible starting knot! Of course, I learned the hard way, and here is a great tutorial posted just a few days later.
Oh! I almost forgot. I stitched up this card on the way to Portland :o)
 I finished the hankie I started for my mom. I decided to go with an understated cream for the initials. Anything else paired with the magenta just looked too 'My Little Pony'.
When I say madness, that goes both ways. I started this scalloped blanket from Amy Karol's book a little while ago. I was very excited to use some new Kaffe Fassett fabric I got. I used Heirloom Organic batting in the middle. When I turned it right side out, I thought I had made a mistake, because in the valleys of the scallops, the material was bunching pretty badly. I went back and made sure to snip to allow the fabric to curve. But it still bunched. I searched other people's pics for this same project, and it looks like some people had the same problem as me, and a bunch of people had no problem at all. I ironed it down, top stitched the whole thing, ran some stitches on the top both ways, and threw it in the washing machine! I remembered what Amy Karol said, washing and drying can forgive small mistakes, and after a few weeks, all the mistakes are forgotten.

I was determined to make another one right away, because I thought I could do it better this time. I am far enough along to know that the same thing happened! It's still cute, but I wonder what I am doing wrong? Next time I think I will try flannel as the batting...perhaps a thinner blanket will bunch less? One side is another Kaffe Fassett fabric, and the other side is an AMAZING Kona Cotton by Robert Kaufman. This stuff is truly incredible, and I can't use anything but this stuff for my quilt solids. I also used it for a few other crafts with great results.


 Posts
Posts


