Friday, November 30, 2007

5 victims in 4 graves


As usual, the title has nothing to do with the post, I just watched Sleepy Hollow recently. Anyway, I finished a second baby hat for my old friend from high school. This is the first hat. They are both on my Etsy page in the sold section. If you want your own, let me know!!

So on to the technical stuff... I modified the pattern from Crochet Today Magazine mentioned in this post to accommodate for a 4-5 month-old's tiny head. Firstly, I used an I/9 hook and Red Heart yarn in Soft Navy. Then, on the band, I decreased the number of stitches wide and decreased the number of rows. I followed the same basic pattern for the crown and brim. The earflaps were freehand... I learned the basics of making them from past earflap hats: basically decrease at each end on every other row, if that makes sense.... Until I got down to 2 stitches and just built on those until they were long enough to be ties. So there you have it! Weeeee!!


New toys and new projects

Well, they are toys to me anyway! I got a new iron (fantastic!), and cutting mat and a rotary cutter. This is my first rotary cutter. I'm basically just finding out what it can and cannot do. The iron replaced an old wonderful iron that just finally died. It had a great run. But this new one....wow. Upright steam rocks.

I have not been able to post for a while because of (A) not having a working camera and (B) being on vacation. But that doesn't mean I wasn't busy! I bought a new camera (sorry I can't take a picture of it, ha! It's a Canon 720). Here are some works in progress.....
An embroidery project for a Christmas gift...I'm not going to say to who!


The beginning of the felt garland. The pattern is here, from the lovely Anna Maria.

The beginning of a purse for my sister, which I could have finished in one sitting, had I not decided to make it lined. I didn't have a yard of anything suitable, so it's off to the fabric store tonight! I rarely go shopping for fabric with a specific project in mind; this should be fun.


And lastly, some fabrics with destinies! Brown corduroy for another purse, holiday plaid for pillows, and a beautiful brocade for another (commissioned!) bag. So many projects, so little time!

Monday, November 26, 2007

Itty Bitty Tree


Step 1. Cut out a piece of felt that is shaped like a slice of pie, NOT a triangle. The bottom part must be rounded, as if you had drawn it with a protractor.
Step 2. While it is still a nice flat little thing, run it through the machine with any fancy stitches you like.
Step 3. French knots for the 'ornaments'. I wound the thread around the needle TWICE to make them slightly bigger. It's all just what you like. Here is a tutorial on how to do french knots if you have never done them before.
Step 4. Turn right side in and sew along the side.
Step 5. Stuff with stuffing!
Step 6. Lay your cone on another piece of brown felt (or whatever color you like) and trace around it with chalk. This will be your bottom.
Step 7. Sew bottom on to the cone. Any stitch will do! It doesn't matter if the stitches are visible...I think it looks cute.
Step 8. Before sewing the bottom completely on, find something to shove into the bottom to keep it 'bottom heavy'. Otherwise this wee thing will want to just blow away. I simply wrapped about 2 tablespoons of rice in a paper towel and crammed it in there. You could use dry beans too.
Step 9. Sew up the opening and you are done!
Step 10. Give to loved one :o)

Thursday, November 22, 2007

pumpkin cupcakes!


Mateo is turning two tomorrow and we had a party for him last weekend, as my co-blogger mentioned. We made some awesome pumpkin cupcakes with cream cheese frosting for the event. This was my first attempt at baking anything that required sifting as my only escapades into baking in the past were cookies.

The only advice I have is to really let the cream cheese come to room temperature before attempting to make the frosting.We were approachin
g the 2 o'clock hour (AM) and I think my judgment may have been a little foggy at that point.

As you can see, they came out beautifully and were as delicious as they were cute!

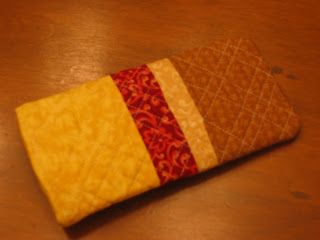
john's eyeglass case

I made this eyeglass case for John's birthday using the pattern from Denyse Schmidt's Quilt-It Kit. The pattern is also in the Quilts book, but i liked having the little card from the kit to take back and forth with me from cutting table to sewing machine to ironing board. It was a lot of fun because it wasn't a rigid pattern and it was easy to machine quilt in a not-so-parallel fashion. The only hard part was hemming the opening with all those layers!! I think I achieved as manly a quilted eyeglass case as possible. I used fabric from those little quilting bundles sold at Joann Fabrics.

The interior is freakin' sweet too! Too bad I couldn't get a good shot!

Tuesday, November 20, 2007

The Story of You and You

I have been working on this for about 3 weeks. It is a small story book for my dad, for Christmas, and tells the story of him and his wife (sort of, I mean, it's a story book; plus most of it is an inside joke sort of thing). Each page was hand drawn, and then painted in watercolors. The cover was also hand embroidered, using a design from this amazing crewel book called The New Crewel. Then I sewed together the cover and bound the pages in. Please excuse any picture blurryness...I had to borrow an unfamiliar camera. Here is the story from front cover to back:


Framed stitchery


I had an idea for this last weekend, and it came out exactly how I pictured. Simple.

The doll


Finally I can post pictures of the doll! It was Mateo's birthday last weekend, and this is what I made him. The pattern is from Wee Wonderfuls, for the little boy named Archie. It took about 2 weeks or so, and doing the bottom and the legs lent to hours of cursing. Well, maybe minutes. Here he is making friends with Phoebe:


Here is the back where you can see the acorn backpack, also from Wee Wonderfuls.

I used kona cotton for the face and hands, wool for the body and arms, poly blend for the legs, and regular craft felt for the hair, eyes, and shoes. With this project I learned how to do stitches in the middle of the face without leaving a visible starting knot! Of course, I learned the hard way, and here is a great tutorial posted just a few days later.

Oh! I almost forgot. I stitched up this card on the way to Portland :o)

Friday, November 16, 2007

Finished Hankie


I finished the hankie I started for my mom. I decided to go with an understated cream for the initials. Anything else paired with the magenta just looked too 'My Little Pony'.

Wednesday, November 14, 2007

Scalloped Blanket MADNESS


When I say madness, that goes both ways. I started this scalloped blanket from Amy Karol's book a little while ago. I was very excited to use some new Kaffe Fassett fabric I got. I used Heirloom Organic batting in the middle. When I turned it right side out, I thought I had made a mistake, because in the valleys of the scallops, the material was bunching pretty badly. I went back and made sure to snip to allow the fabric to curve. But it still bunched.


I searched other people's pics for this same project, and it looks like some people had the same problem as me, and a bunch of people had no problem at all. I ironed it down, top stitched the whole thing, ran some stitches on the top both ways, and threw it in the washing machine! I remembered what Amy Karol said, washing and drying can forgive small mistakes, and after a few weeks, all the mistakes are forgotten.


I was determined to make another one right away, because I thought I could do it better this time. I am far enough along to know that the same thing happened! It's still cute, but I wonder what I am doing wrong? Next time I think I will try flannel as the batting...perhaps a thinner blanket will bunch less? One side is another Kaffe Fassett fabric, and the other side is an AMAZING Kona Cotton by Robert Kaufman. This stuff is truly incredible, and I can't use anything but this stuff for my quilt solids. I also used it for a few other crafts with great results.


Cookies and stitches

Last night I was graced with a bag of butterscotch chips, and decided to do something I almost never do...make the recipe on the back of the package! They were oatmeal butterscotch cookies, nice and crispy on the outside and chewy on the inside. I didn't follow the recipe exactly, I cut out about a third of the sugar. Before and after pictures:


Then I started a new hankie project, intended for my mom for Christmas. I used a template from Sublime Stitching. You can barely make out the design on the fabric, with her initials (t.q.) and I am very happy with the color I chose. Although these hankies always turn out nice, they are very delicate and probably will never be used as intended. I am now on the hunt for a nice handkerchief weight linen that can be both dainty and practical. Here it is so far:

sunglasses cozy


This is my sunglasses cozy so I don't lose the suckers in my gigantic bag. It is stretchy since its a knit so should accommodate even Paris Hilton's sunglasses! So, here's how to make it! I used size 9 needles and Red Heart Super Saver yarn in Earth & Sky.


Cast on 22 stitches

Work even in stockinette stitch until piece measures 7-1/2"

Bind off 11 stitches

Work even with remaining 11 stitches in stockinette, forming a flap, until the whole piece measures 10-1/2" in length.

Bind off remaining 11 stitches, fasten off.
Fold the piece in half lengthwise with right sides together. Sew bottom and side up to where flap begins and fasten off.
Weave in loose ends.
Can be finished with a button or velcro to keep flap closed.

If you want to keep nicer glasses in this cozy, I would suggest using something softer than Super Saver.

The End!

HAT!


I made this awesome hat for a friend's baby. Its the Lil Critter Hat pattern from the Knit Knack Kit by Kris Percival. When I casted on, I guess I had too much tension going and was afraid that the hat would come out small. So, when binding off, it let it be a little loosey-goosey and it came out fine. I added a stripe of blue/brown variegated yarn
on the front so that it wouldn't look like weird hair, hahaha.... it happens! I have no babies in the household small enough to model the hat, so Food the bear will have to do!

Tuesday, November 13, 2007

Gnome-arama!

I must have this gnome pattern!

Charming Handbag II


I started a second handbag on Sunday, but this time I used a thicker twill for the outside. I had fabric left over from a pair of pants I started years ago, and then lost some of the pattern pieces! When I turned it from outside in to inside out, it was difficult because the fabric was so thick. The result: my seams opened up at the curves, where there was the most stress.
Last night I revisited the handbag and added a trim to the top...I know it has an unfinished look but that's what I was going for. I still need to add the handle strap.

Monday, November 12, 2007

Stitchery!


One day all of a sudden I got the stitchery bug and immediately had to have supplies! I was fortunate enough to come across this amazing book, Sublime Stitching. It has lots of colorful pictures and information, which was great for me as a beginner, but would also be nice for someone more skilled who is just looking for cool patterns. In the back are tons and tons of patterns, it's a pretty good portion of the book! They iron transfer onto your fabric and can be used more than once. Here was my first attempt. The front looks pretty good, and the back is ridiculously messy. My first hankie from scratch! I did a simple straight stitch around the edges. Very pleased.

The lined zipper pouch


Like many people, I have attempted the lined zipper pouch without a good tutorial, and ended up wanting to tear my hair out. Then I found this, a beautifully illustrated step by step showing how to do it. The result was this lovely pink creation you see, complete with confusing felt appliquéd hills and a moon and stars on the side.
The outside is all felt, and the inside was from a fat quarter from Joann's, along with 7" zipper, making this a pretty inexpensive thing to make.

Saturday, November 10, 2007

the importance of making a gauge swatch


So, I made a hat using the "newsboy cap" pattern in Crochet Today magazine from Feb/Mar '07. It is for my friend Amanda's birthday. I followed the suggestion of the pattern to use a size J/10 hook and made no gauge swatch. It came out kind of squat and too big around.

I waited a few days and decided to try a again with an I/9 hook. This time I made a gauge swatch and it matched up the the specifications in the pattern. The hat came out perfectly and will definitely fit a human head (see photos) unlike the previous attempt which will most likely be a better on a bovine.

Also, please excuse my modeling, I will get a wig form for future hat/ head wear photos. =]